Category Archives: Painting Process

Thirty Seven Ears Painting Process #2

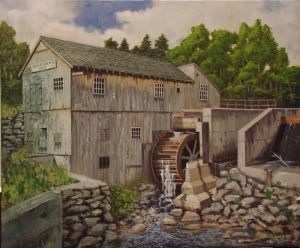
Paint Process: Thirty Seven Ears                                                         Rev.5-3-13

Ground: Masonite panel              

Lesson 2

The first lesson covered the rough sketch, finished drawing, and transferring the drawing to the panel. In this lesson we will begin the under painting.

All this painting was done with the panel flat on the work table. This allows better control of the washes and other methods I used throughout the painting. I generally use one brush for the entire painting. I prefer a Loew-Cornell 720 Ultra Round, #12. The washes for the rear wall, beams and ears of corn were done with this brush. To begin the painting I used Ouinacridone Red-orange for the background wall, a thin wash of Permanent Blue Light for the beams, and Burnt Sienna for the cast shadows. These are rather thin washes with some of the white ground showing through.

A wash of Prussian Blue was used on the six sections of wall. I did one section at a time by applying the wash and leaving some of the Ouinacridone Red-orange showing through. Right after the Prussian Blue wash was applied, and before it gets too dry, I use my fingertips to flick drops of soapy water onto the damp blue in a random pattern. I wait until the soapy water softens the damp blue, then I blot the section with paper towels to remove some of the blue. I then dry the surface with a hair drier to speed things up.

To under paint the corn, I used a thin wash of the contrasting color of the finished corn. Violet for the yellow corn. Hookers Green for the red corn, and permanent Blue Light for the orange corn. I indicate some of the cast shadows at this time by using a stronger wash of color. The final colors of the corn and the positions of the corn changed slightly as I made adjustments throughout the process. At this point, I started the color map for the painting as described in the first lesson.

37 Ears 4

Using the same brush, I added a second wash of Prussian Blue over the wall and flicked more soapy water on the surface, then blotted some off before it dried. I put a wash of Burnt Sienna over all of the posts and beams, and did the soapy water-blotting method on these. This was followed by applying some indication of wood grain with thin Prussian Blue. I added some floor joists behind the beams at the top of the painting. This gives some depth to the picture and served as the reason for the cast shadow at the top of the beam and on the wall.

37 Ears 22

I began adding wood grain on the lower half of the wall using thin lines of Yellow Ocher, Burnt Sienna, Raw Sienna and a little white. I went over the grain of the wood several times, adding swirls and knots in a random pattern. I placed some gaps between the boards using Prussian Blue, Hookers Green Deep and Ouinacridone Red-orange (I never use black or Payne’s Gray). I didn’t paint wood grain on the top section of the wall.

I considered the back wall, floor joist and beams as “supporting actors” in the image I’m trying to create. I save the finer, detailed work for the “star” of the show, the corn. I consider all this work thus far as under painting. Using opposite colors, thin washes, wetting damp paint and blotting are some of the methods I use. The hair dryer speeds up the drying process and using rags, paper towels, and crumpled aluminum foil can create an interesting effect in any painting.

I added the white wash and some details to the beams, experimenting with the lower part of the post first. I used White, Burnt Umber and a touch of Hookers Green Deep to make a soft, dull grey. I used the side of the brush to apply this mixture. I loaded the brush with moderately dry paint, held the brush almost parallel with the surface, and dragged the paint over the surface of the posts. The tiny peaks formed by the rolled geso pick off the paint from the brush.  I also rotate the brush slightly to expose more paint to the surface. As soon as I apply the paint to one area, I splatter it with soapy water and daub the damp paint with a paper towel. The left, horizontal rail has one thin coat of White with some broken color. The top left and center post has two applications of paint and daubing and the bottom of the post has some cracks, wood grain and worm holes added.

37 Ears 33

I started experimenting by painting the kernels on a couple of ears. In the next lesson I explain how I used a Grumbacher #2 Round Liner brush to apply between five and ten coats of thin paint to each kernel of corn.

Summary:

  • Working with the panel flat helps control paint flow with the washes.
  • Under paint major areas with contrasting washes of color.
  • Start the color map at this point.
  • Indicate cast shadows with stronger washes.
  • Flick soapy water on each section before it dries completely.
  • Blot these drops of water with crumpled paper towels.
  • Continue adding thin washes, wetting and blotting as needed.
  • Build up details with washes, dry brushing and wet-blot as needed.
  • Spend less time on secondary areas (the “supporting actors”) and more time on the ears of corn (the “stars”) of the image.

Next lesson: Laying out the rows of kernels, building the illusion of domed kernels, highlights and cast shadows.

Thirty Seven Ears Wins People’s Choice Award

Linda Hall, President of the Greater Salem Artists Association, presented me with the ribbon for People’s Choice Award for my painting Thirty Seven Ears. This was presented at the conclusion of the Greater Salem Artists Association Spring Show on April 20, 2013.

You can follow the painting process I used to produce this work in three lessons I’m presenting on this home page.

2013-04-20 Don Whittemore receives award

New! Camera Obscura Page

The Camera Obscura Project

I’ve added a new page on the construction of a camera obscura. Click on the Camera Obscura tab at the top of the page to see how this fascinating project evolved, and what comes next.

Right side view

C.O.1  projected on tracing paer

Art in Action at Mack’s Apples, Londonderry, NH

Art in Action will feature 20 artists working in various mediums at Mack’s Apple Farm Stand at 230 Mammoth Road (Route 128), Londonderry, NH.  The date is Saturday May 15th, and Sunday May 16th.   The hours are 10:00 AM to 4:00 PM both days.

I will have several of my newest paintings there, and will be demonstrating my painting methods. I will also have an ongoing slide presentation so you can see most of my work and other painting processes.  This is an inside show, and weather won’t be a concern.  Stop by and see the excellent work all of these artists create.

Ribbon Won in GSAA Spring Art Show

I won the Popular Vote at the Greater Salem Artists Association Spring Show on April 9th.  Native American Dancer #2 was the winner.  We had 400 visitors at the show, and it was a great time for all.  Here is my set-up at this show.  You can see the winning painting here.

New Still Life Painting Begun

I started a new painting this week with an idea in my mind of a classic still life of a bowl of fruit set on a table.  I began with a 24 X 20 canvas that was prepared by rolling on three coats of gesso, letting each coat dry overnight and lightly sanding each coat.  I had imagined the layout for a few days. I started by lightly sketching in the main elements with Raw Sienna and lots of water, leaving areas of almost pure white where the strongest sunshine would fall.  I was going to place an antique map in a frame in the upper right corner, so I sketched this in, too. The initial sketch was loosely painted and set up the contrasting areas of light and dark.

I followed this up with Burnt Sienna to strengthen the contrast of light and dark. I then went a little further with a wash of Naphthol Crimson (any deep red would do here,) where the deepest shadow would be.  There were a couple of brush strokes that looked like a stack of plates to the left of the bowl of fruit.  I strengthened that idea by indicating the stack of plates with a few quick strokes of paint.

I always let a painting like this “cook”.  Later in the evening, I sat the painting beside the television and frequently stared at it.  The loose brush strokes in the “map” began to resolve into a reflection of a couple of children standing around some object.  You would be seeing the reflection of the group on the other side of the room, behind you. I wanted to add a chair at the end of the table so I am borrowing a chair with lion heads at the top of the side rails from a Vermeer painting as a tribute to one of my favorite artists. I also added a basket under the table to break up this void.

I have a working title of “Reflections” for this painting for now.  It’s a lot of fun, and quite liberating to develop a painting without a source to work from.  I’m thinking of  dark and subdued colors  with a green and gold striped Victorian wall paper; and silver bowl and gold-rimmed plates sitting on a deep mahogany table. Bright sunlight will fall on the wall, bowl of fruit and the tabletop.

Stay tuned for more photos.

Acrylic Workshops – Spring Session, 2011

I have begun a series of five, weekly semi-private acrylic workshops for experienced artists currently using acrylics or any other painting medium.  The workshops will be held once a week in my studio in Windham, NH.

For those folks new to acrylics, the workshops will provide hands-on experience on how to work with this fast drying, versatile medium. Experienced acrylic artists will learn new methods and approaches to get the most from this wonderful paint.  I will share with you all of the painting processes and methods I have developed over 30 years of painting.

Click on the Acrylic Workshops tab on this site for a list of what’s covered in the workshop, and a list of materials needed for the class. If you are interested in taking the five week workshop, e-mail me at www.donsfineart@comcast.net or call at 603-890-6883.  There are currently two openings in the April workshop and I am accepting reservations for additional workshops.

Prerequisites
Each student must have two to three years of painting experience, a basic knowledge of drawing, composition, color theory; and a willingness to try something different and out of their comfort zone in the creative arts.

Objectives
Each workshop will focus on specific methods to get the most from this versatile medium. The workshops are best taken in order, as each workshop will build on the lessons of the previous workshop. There will be homework assignments at the end of some sessions.  These completed assignments will be needed for the following session.

The Workshop Studio

Update on Native American Dancer #2

I began the next phase of the Native American Dancer by making a color sample to work out the colors I would use to block in the first layer of over- painting (lower left corner of the photo).   I ended up with Cadmium Red Hue, and darkened this with the Vivid Lime Green for the folds of the shirt.

The skin tones were Burnt Sienna and White, and the buckskin pants were Yellow Oxide, Cadmium Yellow Medium, and White.  The sky is Cobalt Blue, White and a touch of Raw Umber to get the gray clouds.   This was all done with #12 and #14 soft round brushes.

I developed the dancer’s posture and light and dark areas of the clothing.   Next, I’ll lightly sandpaper the dancer and grass with 220 grit sandpaper and start refining the details of the hat, necklace, and face before moving to the shirt and pants.

The layout, under-painting and first layer of the over-painting went quickly, but the details will take up the bulk of the time.  I’m often asked “How long did this take to paint?”, so I’m tracking all of the hours spent on a log.  Thirty one hours to date!

New Painting Started

I started to paint another Native American dancer this week.  The photo was taken at a Pow-wow in September, 2010.  The work is 36” X 48” and my second largest work to date.

I rolled and scraped three coats of gesso on the canvas, then scaled up the photograph onto several sheets of Bristol Board.  I transferred this drawing to tracing paper, and laid the tracing paper over the canvas.  I made a piece of homemade carbon paper by rubbing a #2 pencil all over a small piece of tracing paper, and lay this under the larger tracing paper.  I used a #2 pencil to outline the large areas on the tracing paper, moving the “carbon paper” along as I worked.  Light pressure will produce  a light pencil line on the gessoed canvas.  I don’t use commercial carbon paper because the imprint will bleed through most acrylic paints and ruin it.

I started the background and dancer by blocking in opposite colors of the sky and clothing.  This under painting improves the final color as the work progresses.  The dancer has a pink shirt and buckskin colored pants.  There are only a couple of small feathers, rather than the many feathers of the last Native American dancer I painted (scroll down to see that one).  I’ll add more photos as I make progress.

Chicken Update #3

The second chicken is almost complete.  I used three different photos and arranged them in this composition.  I am attempting to show how lively these birds are, and have painted them on a warm, bright, sandy background.  The working title is Murphy’s Chickens.  This painting should be complete in a couple of weeks.  You can click on these photos for a larger version.

I was able to get close to this Red-wing Blackbird (Agelaius phoeniceus) on the Pow Wow River last weekend.  He was sitting on a jumble of old roots in a mud bank.  This shows the general layout and the under-painting of the major elements.  I usually tone the background before starting the work, but this time I am using the bright white of the gesso on the canvas.  I want the colors to reflect the bright, sunny morning.

I always try to have two or three paintings in the works.  This gives me a chance to switch to another piece if I’m experiencing difficulty with a particular painting.  The next time I go back to the work I put aside, I can have a fresh look at it and can usually get past the difficult spot.  I call this “letting it cook” and it always works.

I will be working on both of these paintings (and a couple of others) at the Mann’s Apple Orchard show next weekend.  I will be demonstrating my painting techniques and showing three new paintings both days of the show.  See the post below for additional information about the show.  Hope to see you there.